Monday, July 25, 2011
Honey Mustard Baked Chicken and Steamed Vegetables
All right! Doesn't that look good?
Today's (or this week's) meal was a lot of fun to experiment with. Before making this one I had never done a baked glaze, nor really baked poultry aside from roasting chicken.
This is a really nice cool evening meal, the tang of the glaze cleansing your palate like a glass of lemonade.
Click "read more" for the production photos.
Sunday, July 24, 2011
Peppered Steak, Broccoli with Mozzarella, and Corn on the Cob
Whoah! Actual content posts are in the queue!
After a full-time spring semester and a half-time summer session at University, I actually had some time today to check my pictures folder and found that I have about 6 months of pictures I hadn't edited and uploaded yet.
So, to tide you over while I find the time to write the posts that will accompany the pictures I spent part of the afternoon editing and uploading, here is a wonderful later summer meal.
I do apologize, this is another final-picture-only post.
The steak was rubbed with McCormick's Grill Mates Montreal Steak Seasoning, which I highly recommend for its strong pepper flavor, along with garlic and sea salt. The broccoli is steamed and lightly salted, with finely shredded mozzarella cheese on top while it is still hot to melt the cheese slightly. Corn on the cob is, well, corn on the cob. Served with butter, salt, and pepper to taste.
We're just getting into the corn season up here in the frozen north. The early and extremely hot summer this year has caused an early crop, so I'm looking forward to having some fresh from the farmer's market before August.
After a full-time spring semester and a half-time summer session at University, I actually had some time today to check my pictures folder and found that I have about 6 months of pictures I hadn't edited and uploaded yet.
So, to tide you over while I find the time to write the posts that will accompany the pictures I spent part of the afternoon editing and uploading, here is a wonderful later summer meal.
I do apologize, this is another final-picture-only post.
The steak was rubbed with McCormick's Grill Mates Montreal Steak Seasoning, which I highly recommend for its strong pepper flavor, along with garlic and sea salt. The broccoli is steamed and lightly salted, with finely shredded mozzarella cheese on top while it is still hot to melt the cheese slightly. Corn on the cob is, well, corn on the cob. Served with butter, salt, and pepper to taste.
We're just getting into the corn season up here in the frozen north. The early and extremely hot summer this year has caused an early crop, so I'm looking forward to having some fresh from the farmer's market before August.
Tuesday, June 7, 2011
Curry and Rice and a formatting adjustment
Okay, I'm going to try a new formatting style: I noticed that all of my posts on here are completely open, showing the entire post on the page, which I don't really like. Back when I was on livejournal, I learned the etiquette of hiding longer posts behind cuts, and it looks like there is a similar option here on blogger.
From now on I plan on beginning my post with the final dish and putting the rest behind a jump cut, that way if you wish to read more about the process, you can, or you can just enjoy the end result.
So, this post is about one of the dishes I forgot to take pictures of, so all you get is the final dish. It's a curry recipe we made with venison sausage and vegetables.
... I forget where the recipe came from, likely online.
As you can see, it has potatoes, carrots, and peas in it along with the venison.
The rice is my usual Basmati cooked in our rice cooker.
From now on I plan on beginning my post with the final dish and putting the rest behind a jump cut, that way if you wish to read more about the process, you can, or you can just enjoy the end result.
So, this post is about one of the dishes I forgot to take pictures of, so all you get is the final dish. It's a curry recipe we made with venison sausage and vegetables.
... I forget where the recipe came from, likely online.
As you can see, it has potatoes, carrots, and peas in it along with the venison.
The rice is my usual Basmati cooked in our rice cooker.
Saturday, January 15, 2011
Deviled Eggs
Okay, so I actually forgot to take pictures during the making of process, but the final image turned out so nice, I wanted to share it with you.
I used the recipe from America's Test Kitchen Family Cook Book. It calls for 7 eggs, mayonnaise, cider vinegar, grainy mustard, Worcestershire sauce, and salt and pepper to season.
Boil the eggs.
Cut the boiled eggs in half and scoop or turn out the yolks into a bowl.
Mash the yolks with the mayonnaise, vinegar, mustard, and Worcestershire sauce.
Put the mash into a plastic Zip-Loc bag and cur one of the corners off to create a make-shift pastry bag.
Squeeze the mash into the halved egg whites and garnish.
I like to garnish with chives and cayenne pepper instead of just salt and black pepper.
We made these last summer for a potluck. I think it was a movie night at the Vali-Hi Drive-In Theater.
I remember these disappeared pretty quickly.
I used the recipe from America's Test Kitchen Family Cook Book. It calls for 7 eggs, mayonnaise, cider vinegar, grainy mustard, Worcestershire sauce, and salt and pepper to season.
Boil the eggs.
Cut the boiled eggs in half and scoop or turn out the yolks into a bowl.
Mash the yolks with the mayonnaise, vinegar, mustard, and Worcestershire sauce.
Put the mash into a plastic Zip-Loc bag and cur one of the corners off to create a make-shift pastry bag.
Squeeze the mash into the halved egg whites and garnish.
I like to garnish with chives and cayenne pepper instead of just salt and black pepper.
We made these last summer for a potluck. I think it was a movie night at the Vali-Hi Drive-In Theater.
I remember these disappeared pretty quickly.
Thursday, July 15, 2010
Beef Enchiladas
Okay, so I've taken a little while longer than I had intended to to post up this next recipe. This was dinner on Monday evening, and here I am posting it two days later.
Anyway, we made Beef Enchiladas, and they were damn tasty. I think in the end they became more baked Fajitas in enchilada sauce, but what the hey, it's Mexican.
So, we begin with dicing up some green peppers, and chopping about half of an onion. The green pepper is for the filling, along with some black olives we sliced and I forgot to take a picture of. The onion is going to be part of the enchilada sauce.
So, we begin with sauteƩing the onion in some olive oil. Later, once it has started to carmelize we throw in some minced garlic. [The garlic cooks up much faster and you don't want it to burn]
The rest of the sauce is tomato pureƩ, which we made by throwing a can of diced tomatoes in our food processor. We were supposed to add chili powder and ground cumin, but since we have neither we substituted with some cayenne powder and salt and black pepper to taste. We'll let this cook and reduce for a while, and move on to the meat.
That was the remains of a 3-pound roast we've had in the freezer for a while. The slab at the top left is fat and connective tissue. [We don't need that for this meal but it really adds flavor in a stew, which is what the roast was originally cut for]
There's the beef slices all cooked up. Most of the fat drained out of the meat or got cooked into it. [When people talk about "marbled" steaks, they're talking about muscle tissue that has a lot of fat going through it.]
Now we start to build the enchiladas. We only had 3 tortillas, which worked out quite nicely, as the baking dish was just the right size. We pour about a ladle-full of enchilada sauce onto the tortilla, then pile on the meat and vegetables, and top it all with a dollop of sour cream and some shredded cheese. We used mild cheddar. Roll it up and place it seam-side down in the baking dish.
Then pour the remaining enchilada sauce over the tortilla rolls, hopefully covering everything. Then cover that all up with the remaining shredded cheese.
Bake it for about 15 minutes at 350 degrees and it should come out like this.
We ate it with cooked peas, though they got a little too cooked.
And we cut up the French Chocolate cake for dessert. It is AWESOME. It's like a really dense chocolate mousse, firm but still creamy and it just melts in your mouth. The recipe called to serve with whipped or sour cream, and I said "to hell with sour cream" so I made some whipped cream for it.
The cake is so rich, we've been slowly sharing with our friends, we can't possibly eat all of it by ourselves.
Anyway, we made Beef Enchiladas, and they were damn tasty. I think in the end they became more baked Fajitas in enchilada sauce, but what the hey, it's Mexican.
So, we begin with dicing up some green peppers, and chopping about half of an onion. The green pepper is for the filling, along with some black olives we sliced and I forgot to take a picture of. The onion is going to be part of the enchilada sauce.
So, we begin with sauteƩing the onion in some olive oil. Later, once it has started to carmelize we throw in some minced garlic. [The garlic cooks up much faster and you don't want it to burn]
The rest of the sauce is tomato pureƩ, which we made by throwing a can of diced tomatoes in our food processor. We were supposed to add chili powder and ground cumin, but since we have neither we substituted with some cayenne powder and salt and black pepper to taste. We'll let this cook and reduce for a while, and move on to the meat.
That was the remains of a 3-pound roast we've had in the freezer for a while. The slab at the top left is fat and connective tissue. [We don't need that for this meal but it really adds flavor in a stew, which is what the roast was originally cut for]
There's the beef slices all cooked up. Most of the fat drained out of the meat or got cooked into it. [When people talk about "marbled" steaks, they're talking about muscle tissue that has a lot of fat going through it.]
Now we start to build the enchiladas. We only had 3 tortillas, which worked out quite nicely, as the baking dish was just the right size. We pour about a ladle-full of enchilada sauce onto the tortilla, then pile on the meat and vegetables, and top it all with a dollop of sour cream and some shredded cheese. We used mild cheddar. Roll it up and place it seam-side down in the baking dish.
Then pour the remaining enchilada sauce over the tortilla rolls, hopefully covering everything. Then cover that all up with the remaining shredded cheese.
Bake it for about 15 minutes at 350 degrees and it should come out like this.
We ate it with cooked peas, though they got a little too cooked.
And we cut up the French Chocolate cake for dessert. It is AWESOME. It's like a really dense chocolate mousse, firm but still creamy and it just melts in your mouth. The recipe called to serve with whipped or sour cream, and I said "to hell with sour cream" so I made some whipped cream for it.
The cake is so rich, we've been slowly sharing with our friends, we can't possibly eat all of it by ourselves.
Monday, July 12, 2010
French Chocolate Caaake!
Woo Hoo! Finally!
The whole baking process probably took about 2 hours, and then we had to give it a lot of time to cool because it is supposed to be served chilled.
Okay, so to start from the top I simply have to show you the ingredients.
Seriously, that's it! Eggs, butter, sugar, flour (One tablespoon!) Chocolate, and some orange liqueur for flavor.
So, to start off we need to prepare the spring-form (read: cheesecake) pan. The recipe says to generously grease the entire pan, and then line the bottom with a greased piece of parchment paper.
I didn't have any paper towels with which to apply Crisco, so I cheated and used PAM cooking spray [In retrospect I think this was a bad idea, you'll see with the final look of the cake below] Also, the parchment paper was a little smaller than the pan base, I don't know exactly why because I traced the inside of the wall when it was closed.
Anyway, that's taken care of, so now on to preparing the chocolate!
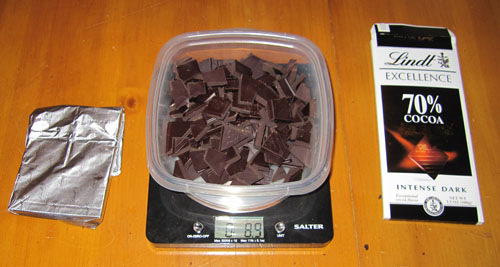
The recipe calls for NINE OUNCES of dark chocolate. That's two and a half of the 3.5oz/100g bars you can get at the grocery store. [I have no idea what we're going to do with the leftover chocolate...]
I swear the scale read 9.0 right before I took the picture.
So the chocolate needed to be melted along with the butter and sugar. Double-boiler FTW!
Look at that glorious, velvety, goopy mess.
Now, we turn to the eggs, which will make up the majority of the volume of the cake.
We need to beat the eggs for a minute to blend and slightly whip them.
Oh! I forgot to mention the last thing you need to do to the chocolate mixture once it cools a little bit.
This is when you add the Orange Liqueur. I used Marie Brizard's Parfait Amour, which is a French Orange Liqueur that I thought would be fitting.
Back to the eggs, and the bowl in which we'll be mixing the batter.
Once the eggs are beaten, you fold in the tablespoon of flour, and then pour in the chocolate mixture.
Beat everything together until it is well blended, and it looks like this.
Now we pour the batter into the spring-form pan.
You may notice that the spring-form pan is sitting in the lid of a turkey roasting pan; it is also covered in foil on the bottom. This is because we are going to pour boiling water into the roasting pan to help set the eggs in the batter while it bakes.
[You may also notice the image is a little blurry, that's because I forgot to turn off the automatic functions of the camera and make sure the flash was on]
So, now the boiling water is in the roasting pan.
Into the oven with ye! [And bake for 30 minutes]
When it comes out, it looks a lot like a cheesecake, however this will actually become the bottom of the cake.
As it cools, the cake will settle and shrink a bit, as you can see from it separating from the edge of the pan. This was about 20 minutes after we removed it from the oven.
All right, here is the cake flipped over and placed in a serving plate. [Here is why i think the Pam was a bad idea; see the wrinkles in the cake top? I think it was because the water content in the Pam soaked the parchment paper and warped it.]
We're not quite done yet, the cake needs to be decorated. To do this, we will make a negative-lattice pattern using powdered sugar and parchment paper strips.
And here's the final decorated cake. You can see the grooves set into the cake top by the wrinkled parchment paper. I don't think it will affect the taste at all, just the presentation.
I'll tell you how it tastes later tonight when we have it for dessert after dinner.
The whole baking process probably took about 2 hours, and then we had to give it a lot of time to cool because it is supposed to be served chilled.
Okay, so to start from the top I simply have to show you the ingredients.
Seriously, that's it! Eggs, butter, sugar, flour (One tablespoon!) Chocolate, and some orange liqueur for flavor.
So, to start off we need to prepare the spring-form (read: cheesecake) pan. The recipe says to generously grease the entire pan, and then line the bottom with a greased piece of parchment paper.
I didn't have any paper towels with which to apply Crisco, so I cheated and used PAM cooking spray [In retrospect I think this was a bad idea, you'll see with the final look of the cake below] Also, the parchment paper was a little smaller than the pan base, I don't know exactly why because I traced the inside of the wall when it was closed.
Anyway, that's taken care of, so now on to preparing the chocolate!
The recipe calls for NINE OUNCES of dark chocolate. That's two and a half of the 3.5oz/100g bars you can get at the grocery store. [I have no idea what we're going to do with the leftover chocolate...]
I swear the scale read 9.0 right before I took the picture.
So the chocolate needed to be melted along with the butter and sugar. Double-boiler FTW!
Look at that glorious, velvety, goopy mess.
Now, we turn to the eggs, which will make up the majority of the volume of the cake.
We need to beat the eggs for a minute to blend and slightly whip them.
Oh! I forgot to mention the last thing you need to do to the chocolate mixture once it cools a little bit.
This is when you add the Orange Liqueur. I used Marie Brizard's Parfait Amour, which is a French Orange Liqueur that I thought would be fitting.
Back to the eggs, and the bowl in which we'll be mixing the batter.
Once the eggs are beaten, you fold in the tablespoon of flour, and then pour in the chocolate mixture.
Beat everything together until it is well blended, and it looks like this.
Now we pour the batter into the spring-form pan.
You may notice that the spring-form pan is sitting in the lid of a turkey roasting pan; it is also covered in foil on the bottom. This is because we are going to pour boiling water into the roasting pan to help set the eggs in the batter while it bakes.
[You may also notice the image is a little blurry, that's because I forgot to turn off the automatic functions of the camera and make sure the flash was on]
So, now the boiling water is in the roasting pan.
Into the oven with ye! [And bake for 30 minutes]
When it comes out, it looks a lot like a cheesecake, however this will actually become the bottom of the cake.
As it cools, the cake will settle and shrink a bit, as you can see from it separating from the edge of the pan. This was about 20 minutes after we removed it from the oven.
All right, here is the cake flipped over and placed in a serving plate. [Here is why i think the Pam was a bad idea; see the wrinkles in the cake top? I think it was because the water content in the Pam soaked the parchment paper and warped it.]
We're not quite done yet, the cake needs to be decorated. To do this, we will make a negative-lattice pattern using powdered sugar and parchment paper strips.
And here's the final decorated cake. You can see the grooves set into the cake top by the wrinkled parchment paper. I don't think it will affect the taste at all, just the presentation.
I'll tell you how it tastes later tonight when we have it for dessert after dinner.
Saturday, July 10, 2010
Slight schedule adjustment
Okay, so things aren't going to be set forth exactly as I had anticipated.
I forgot that while my wife is up north with her girlfriend, she has the camera. So rather than giving you pictures of making the French chocolate cake I told you about I take from my phone, I'm going to wait until she comes home tomorrow evening to bake the cake.
Seriously, you would not believe the difference a proper mechanical focus will give to the pictures a camera can take.
That, and I got asked to assist with the main stage sound at Norway Day tomorrow, so I'll be up really early in the morning and I don't want to stay up any later tonight baking.
So that's the plan, I'll bake the French Chocolate cake tomorrow evening. The recipe calls for Orange Liqueur, so I picked up a bottle of Parfait Amour, made by Marie Brizard. It's french, so I'm sure it will be appropriate. I'll set the Espresso Granita (the coffee-flavored shaved ice) in the freezer tomorrow evening and serve it up on Monday.
I forgot that while my wife is up north with her girlfriend, she has the camera. So rather than giving you pictures of making the French chocolate cake I told you about I take from my phone, I'm going to wait until she comes home tomorrow evening to bake the cake.
Seriously, you would not believe the difference a proper mechanical focus will give to the pictures a camera can take.
That, and I got asked to assist with the main stage sound at Norway Day tomorrow, so I'll be up really early in the morning and I don't want to stay up any later tonight baking.
So that's the plan, I'll bake the French Chocolate cake tomorrow evening. The recipe calls for Orange Liqueur, so I picked up a bottle of Parfait Amour, made by Marie Brizard. It's french, so I'm sure it will be appropriate. I'll set the Espresso Granita (the coffee-flavored shaved ice) in the freezer tomorrow evening and serve it up on Monday.
Subscribe to:
Posts (Atom)