Thursday, July 15, 2010

Beef Enchiladas

Okay, so I've taken a little while longer than I had intended to to post up this next recipe. This was dinner on Monday evening, and here I am posting it two days later.


Anyway, we made Beef Enchiladas, and they were damn tasty. I think in the end they became more baked Fajitas in enchilada sauce, but what the hey, it's Mexican.

So, we begin with dicing up some green peppers, and chopping about half of an onion. The green pepper is for the filling, along with some black olives we sliced and I forgot to take a picture of. The onion is going to be part of the enchilada sauce.

So, we begin with sauteƩing the onion in some olive oil. Later, once it has started to carmelize we throw in some minced garlic. [The garlic cooks up much faster and you don't want it to burn]

The rest of the sauce is tomato pureƩ, which we made by throwing a can of diced tomatoes in our food processor. We were supposed to add chili powder and ground cumin, but since we have neither we substituted with some cayenne powder and salt and black pepper to taste. We'll let this cook and reduce for a while, and move on to the meat.

That was the remains of a 3-pound roast we've had in the freezer for a while. The slab at the top left is fat and connective tissue. [We don't need that for this meal but it really adds flavor in a stew, which is what the roast was originally cut for]

There's the beef slices all cooked up. Most of the fat drained out of the meat or got cooked into it. [When people talk about "marbled" steaks, they're talking about muscle tissue that has a lot of fat going through it.]

Now we start to build the enchiladas. We only had 3 tortillas, which worked out quite nicely, as the baking dish was just the right size. We pour about a ladle-full of enchilada sauce onto the tortilla, then pile on the meat and vegetables, and top it all with a dollop of sour cream and some shredded cheese. We used mild cheddar. Roll it up and place it seam-side down in the baking dish.

Then pour the remaining enchilada sauce over the tortilla rolls, hopefully covering everything. Then cover that all up with the remaining shredded cheese.

Bake it for about 15 minutes at 350 degrees and it should come out like this.

We ate it with cooked peas, though they got a little too cooked.

And we cut up the French Chocolate cake for dessert. It is AWESOME. It's like a really dense chocolate mousse, firm but still creamy and it just melts in your mouth. The recipe called to serve with whipped or sour cream, and I said "to hell with sour cream" so I made some whipped cream for it.

The cake is so rich, we've been slowly sharing with our friends, we can't possibly eat all of it by ourselves.

Monday, July 12, 2010

French Chocolate Caaake!

Woo Hoo! Finally!

The whole baking process probably took about 2 hours, and then we had to give it a lot of time to cool because it is supposed to be served chilled.

Okay, so to start from the top I simply have to show you the ingredients.

Seriously, that's it! Eggs, butter, sugar, flour (One tablespoon!) Chocolate, and some orange liqueur for flavor.

So, to start off we need to prepare the spring-form (read: cheesecake) pan. The recipe says to generously grease the entire pan, and then line the bottom with a greased piece of parchment paper.


I didn't have any paper towels with which to apply Crisco, so I cheated and used PAM cooking spray [In retrospect I think this was a bad idea, you'll see with the final look of the cake below] Also, the parchment paper was a little smaller than the pan base, I don't know exactly why because I traced the inside of the wall when it was closed.

Anyway, that's taken care of, so now on to preparing the chocolate!

The recipe calls for NINE OUNCES of dark chocolate. That's two and a half of the 3.5oz/100g bars you can get at the grocery store. [I have no idea what we're going to do with the leftover chocolate...]

I swear the scale read 9.0 right before I took the picture.

So the chocolate needed to be melted along with the butter and sugar. Double-boiler FTW!

Look at that glorious, velvety, goopy mess.


Now, we turn to the eggs, which will make up the majority of the volume of the cake.

We need to beat the eggs for a minute to blend and slightly whip them.

Oh! I forgot to mention the last thing you need to do to the chocolate mixture once it cools a little bit.

This is when you add the Orange Liqueur. I used Marie Brizard's Parfait Amour, which is a French Orange Liqueur that I thought would be fitting.

Back to the eggs, and the bowl in which we'll be mixing the batter.


Once the eggs are beaten, you fold in the tablespoon of flour, and then pour in the chocolate mixture.

Beat everything together until it is well blended, and it looks like this.

Now we pour the batter into the spring-form pan.
You may notice that the spring-form pan is sitting in the lid of a turkey roasting pan; it is also covered in foil on the bottom. This is because we are going to pour boiling water into the roasting pan to help set the eggs in the batter while it bakes.
[You may also notice the image is a little blurry, that's because I forgot to turn off the automatic functions of the camera and make sure the flash was on]

So, now the boiling water is in the roasting pan.

Into the oven with ye! [And bake for 30 minutes]

When it comes out, it looks a lot like a cheesecake, however this will actually become the bottom of the cake.

As it cools, the cake will settle and shrink a bit, as you can see from it separating from the edge of the pan. This was about 20 minutes after we removed it from the oven.

All right, here is the cake flipped over and placed in a serving plate. [Here is why i think the Pam was a bad idea; see the wrinkles in the cake top? I think it was because the water content in the Pam soaked the parchment paper and warped it.]

We're not quite done yet, the cake needs to be decorated. To do this, we will make a negative-lattice pattern using powdered sugar and parchment paper strips.

And here's the final decorated cake. You can see the grooves set into the cake top by the wrinkled parchment paper. I don't think it will affect the taste at all, just the presentation.

I'll tell you how it tastes later tonight when we have it for dessert after dinner.

Saturday, July 10, 2010

Slight schedule adjustment

Okay, so things aren't going to be set forth exactly as I had anticipated.

I forgot that while my wife is up north with her girlfriend, she has the camera. So rather than giving you pictures of making the French chocolate cake I told you about I take from my phone, I'm going to wait until she comes home tomorrow evening to bake the cake.

Seriously, you would not believe the difference a proper mechanical focus will give to the pictures a camera can take.

That, and I got asked to assist with the main stage sound at Norway Day tomorrow, so I'll be up really early in the morning and I don't want to stay up any later tonight baking.

So that's the plan, I'll bake the French Chocolate cake tomorrow evening. The recipe calls for Orange Liqueur, so I picked up a bottle of Parfait Amour, made by Marie Brizard. It's french, so I'm sure it will be appropriate. I'll set the Espresso Granita (the coffee-flavored shaved ice) in the freezer tomorrow evening and serve it up on Monday.

Friday, July 9, 2010

The weekend of desserts!

So, I'm going to try out some new dessert recipes this weekend. Lately, I've been perusing a new food book we bought a while back titled, "The Chocolate and Coffee Bible". It is AMAZING.

It's divided into two sections, Chocolate and Coffee. Each section starts out with a history of the foodstuffs, when it was discovered, where it was cultivated and developed, and how it spread worldwide. Then it talks about famous proprietors and confectioners and how they got into the business. Then it goes into the various forms and how they are made. It's facinating.

But then, oh then, the rest of each section is devoted to recipes. In the Chocolate section, every recipe has chocolate in it, likewise in the Coffee section. There are recipes for cakes, tarts, drinks, candies, ice cream, cookies, bars, breads, and oodles of other goodies.

I'm planning on making a French chocolate cake, and an Italian iced coffee dessert that kind of reminds me of the shaved ice I had when I was in Hawaii 14 years ago.

So yeah, I'm really looking forward to this weekend.

Thursday, July 8, 2010

Lazy update about dinner

No photojournalism for tonight's dinner, sorry. We found out about half-way through getting things set out that we needed to clean the fridge pretty urgently. Nothing like the smell of gooey, dead zucchini assaulting your nostrils while you reach for the tomatoes.

So tonight's dinner was a slap-dash of cooked vegetables over angel hair pasta.


Broccoli, zucchini (not the dead one, ew.), sugar snap peas, carrots, green onions, and mini tomatoes. We cooked the vegetables in  the wok, first in some olive oil, then I added some red wine vinegar for flavor. We seasoned it with an herb blend called "Pasta Sprinkle" by Penzey's Spices, I think it's basil, oregano, rosemary, thyme, and parsley.

When we added the zucchini I opted to add about a 1/4th cup of water so that we could kind of steam everything together and at the same time, not have to worry about setting it aside and burning.

Add a little grated parmesan cheese, and you've a nice sauce-less spaghetti dish. Or you could add a LOT of parmesan cheese while exclaiming, "BLIZZARD!" like my wife does. Though I have to admit, I've started doing it too.

Tuesday, July 6, 2010

Dinner is Served!

Okay, so my first content post! Tonight I made Soba noodles with Chicken, sauteed green onions, broccoli, & garlic, and shiitake mushrooms in a roasted peanut sauce. It's really easy to modify box dinners, they often include suggestions right on the box.

I started with a frozen chicken breast and a box of Simply Asia Roasted Peanut Noodles.

The first step was to get the chicken cooked.


We have a really nice electric griddle my wife got from her parents, and it is a treat to cook chicken on. It even had some leftover bacon grease, so I didn't even need to oil it. [Bacon grease is one of the greatest fats to cook things in; it hardly imparts any flavor to what you're cooking, it doesn't burn like butter can, and doesn't dry out meat]

Well, I guess the first step was to put a pot of water on the stove to boil for the noodles, but I figure that's unnecessary to show.

I cut up the chicken breast while it was still partially frozen, it was thawing in the fridge since breakfast. If you're cutting meat into bite-sized pieces before cooking it, it's best to cut while it's still partially frozen. This gives you much more control over your knife moving through the meat; when meat is room temperature and uncooked, not only is it really malleable, but the fat can be nigh impossible to slice through cleanly, unless your knives are scalpel-sharp (mine aren't)

Here's the chicken on the griddle, cut up and starting to cook. However, I still need to season the chicken. As I mentioned, the bacon grease doesn't season what you cook, so I'll have to add something else.

I chose to use Rice Vinegar and sea salt. The vinegar also tenderizes the meat a little, due to the acid in it. The vinegar cooks off quite quickly so I just needed to cover the griddle, and suddenly I'm steaming the chicken in addition to cooking it on a hot plate! This keeps the chicken moist.

So the chicken is now cooked through and a lot of the vinegar has cooked off. This means I'm ready to set the meat aside and get started on the next thing, right? Nope! I like to brown chicken when I'm putting it in something like the noodles tonight, or when making chicken salad. How do you do this? Just keep cooking it. Eventually the effluvia will start to carmelize and then you're ready to start watching the chicken to make sure it doesn't burn. With the bacon grease and vinegar as a buffer, it's unlikely to burn, but there's always the chance.

Look at that! Isn't that beautiful?

Now it's time to put aside the chicken and start cooking the next additional ingredients. But wait! Now the bottom of the pan is sticky with carmelized food bits! [These are the "brown bits" you're often told to scrape up when cooking meat in a stew-pot for a stew recipe]

It's hard to see, but the brown bits are there. How do you get rid of that without having to wash the pan?

There's a secret: while the pan is still hot, pour come cooking sherry or other wine vinegar into the pan. The alcohol soaks the brown bits and then boils off very rapidly, loosening them from the bottom of the pan. You can do this even while your meat is still cooking, it'll just season it some more.

Whoosh!


And now I can scrape my spatula along the pan and the brown bits are almost gone! There they are floating a the bottom. I just poured it into the garbage, because I'm not doing anything else with it.


So now, on to the vegetables!

To start, I cut up the green onions and broccoli [From the Farmer's Market!]
I included the broccoli leaves as an experiment, I tasted one and it tasted like broccoli, so I figured it might cook like spinach leaves and add some texture to the final dish.

Now, I needed a new oil to cook the vegetables in. I decided to keep with the asian theme and use sesame seed oil. Now, sesame seed oil has a very strong flavor, so if you want to use it as an alternative to vegetable or olive oil, be aware that you should use a little less because otherwise it'll overpower a lot of your other flavors, like putting too much dried celery into a broth.

Back in the griddle again. I turned the heat down a little because I didn't want the onions and broccoli florets to cook too much before the broccoli stems did. Once things started going, I just put the cover back on and let it go.

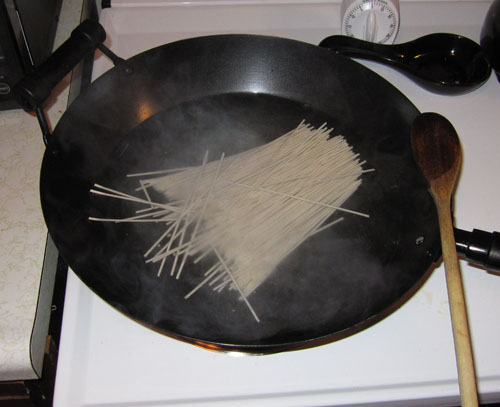
By now the water was finally hot enough to put the noodles in.

After the prescribed 5-7 minutes the noodles were looking very nice.

Here's my plate of extras. At the top is some dried shiitake mushrooms I forgot we had, and decided the throw in at the last minute. The dark spots on the broccoli is minced garlic, which I put in about halfway through cooking the broccoli on the griddle. At last! time to put everything together.

Here's everything but the sauce, I put an extra half-cup of water or so to thin the sauce out to compensate for the extra goodies in the dish.

Everything with the sauce. I let everything boil for another 3 minutes or so, stirring constantly so the noodles didn't glue themselves to the bottom of the pot. I added a dusting of corn starch to help thicken the sauce as well.

At last! Dinner for me. The sauce thickened beautifully. My only thoughts are that I should have let the broccoli stems cook just a little bit more, and soaked the mushrooms a little more before throwing everything together.

All in all, it's another successful meal. From start to finish it took about 45 minutes.
I'll have to wait for my wife to get home so she can have some and tell me her opinion about it.